Before having Liam I loved seeing all of the cute Month-to-Month Updates of babies wearing the cute little onesie's with the stick on numbers that designated their age in months. Cute...but I am way too creative for that...right?
Both of our families live far away so I wanted something that would be more of an all encompassing update. I started to think of fun and creative ways to capture each month with a monthly photo, but that still wasn't enough. I wanted to design something that would capture those precious moments and spell out some of the milestones of the past month.
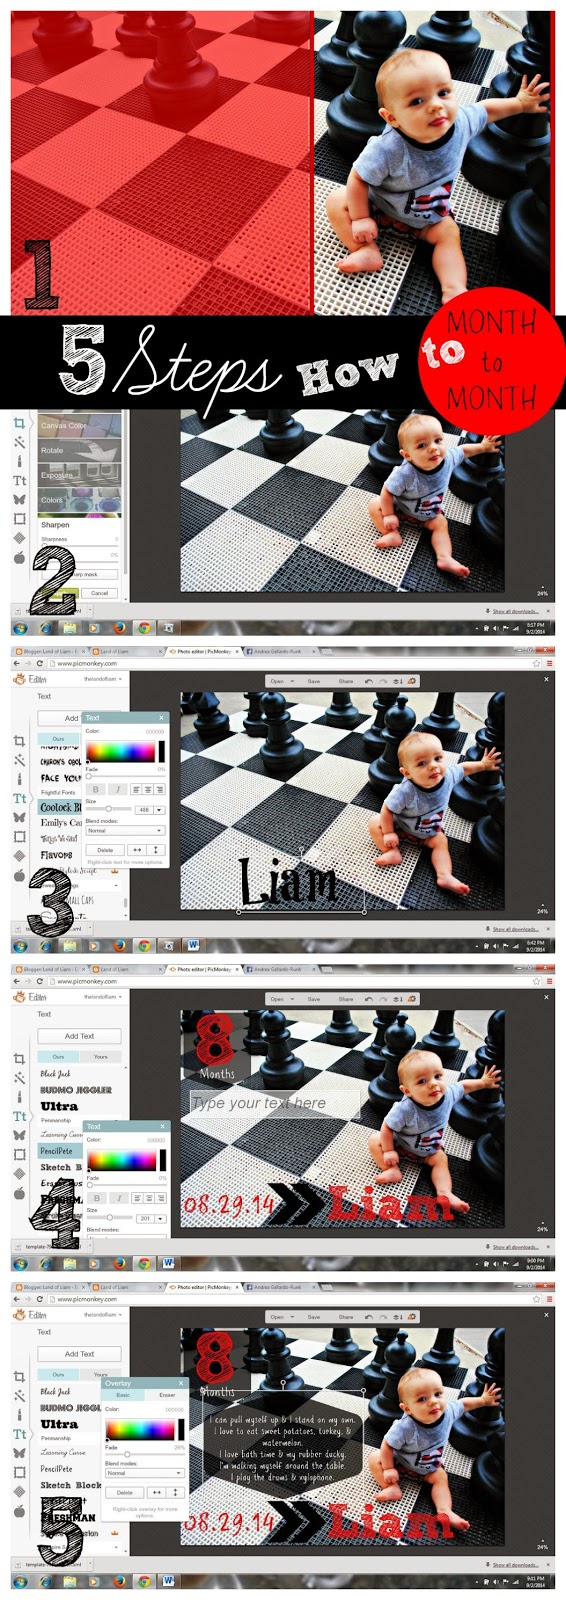
At the one month mark I started to play around with different backgrounds, pictures, and I eventually created a template that I wanted to use. I also started to mess around with a few digital photo editing programs. I worked with Adobe Elements, Pic Collage, and ended up using PicMonkey as my final editor of choice. PicMonkey is FREE and really easy to use. See the Tutorial Below for a 5 Step How To:

Step 1:
Choose your photo. You want to choose a photo that has a plain background or a simple pattern, this will help when you are adding the text to your photo. Make sure that your main subject, the baby, is aligned to the left or right so that we can add the text.
Step 2:
Crop and Edit your photo. PicMonkey has a great simple options menu to enhance your photos. Crop the photo to your desired size (4x6,5x7,8x10). This step is also a chance for you to get the exact image that you want and allows you to crop out all of the unwanted background images. Next, use the Sharpen tool to enhance your photo. I suggest playing around with all of the pre-loaded filters that come with PicMonkey until you get your desired look. I used the Orton filter for this example.
Step 3:
Add the name. I love to play around with all of the cool font's and color options to make the name really pop out. In the past Month-to-Month Updates I have located the name in different locations, down the side, at the top, or at the bottom. Use your best judgement on where to place the name and how it fits with your photo. There is no wrong or right!
Step 4:
Add the date of that month's "birthday" as well has some embellishments. This is also a perfect time to add the month (ie. 8 Months) to your photo. Make sure this is really prominent and jumps out to you. Try using a bold fun font for the number. Use the Picmonkey Overlay option to find some great additions to your photo. Go crazy, have fun!!!
Step 5:
This is the fun part! Remember back to all of the past month's accomplishments and list them out. I use third person narration so it is as if Liam is saying the list. You want this section to jump out. Add borders around it, play with the font options, add items in bold, or pick a fun color.
Tips:
Use a photo that clearly show's your baby and one of his new accomplishments (ie. standing or sitting.)
Be BOLD and ADVENTUROUS, there is no wrong or right!!!
At the end of his 12 months, print a photo book of all of the Month-to-Month Updates to see how much he has grown (this would be a GREAT gift for grandparents).
The final product!!!


.png)


0 comments:
Post a Comment